Applying for a U.S. visa can be stressful enough, right? But did you know that one of the most common reasons for delays or rejections is something as simple as an incorrect photo? That’s right — your photo plays a huge role in your visa application, and if it doesn’t meet the U.S. Department of State’s strict specifications, your entire process could be delayed. Don’t worry, though. I’m here to guide you through everything you need to know before taking a photo for your U.S. visa. From size requirements to background colors, from dress codes to editing rules — we’ll cover it all step by step.
Understanding the Importance of the Visa Photo
When it comes to applying for a U.S. visa, many people underestimate just how crucial the photo really is. It might seem like a simple snapshot, but in reality, it’s a key part of your identity verification. The U.S. government uses the photo to match your face against security databases, travel records, and immigration files. This means any discrepancy, even something minor like a shadow on your face or an outdated hairstyle, can trigger a review or even a rejection. Think of it as your official first impression — and first impressions really matter.
The visa photo isn’t just about looking nice; it’s about accuracy and consistency. Unlike social media photos, which can be heavily edited or filtered, a visa photo must show a true representation of how you currently look. This ensures that when you arrive at a U.S. port of entry, border officers can recognize you immediately without any confusion. Even small details, like wearing glasses or having a head tilt, can create inconsistencies that might slow down your application or cause extra scrutiny.
Another reason the visa photo is so important is security. The U.S. Department of State uses these photos as part of its broader immigration and anti-fraud measures. By maintaining strict standards, the government can prevent identity theft, visa fraud, and entry by individuals who might pose risks. In essence, the photo is more than just a picture — it’s a tool that helps protect both you and the country. It acts as a key piece of identification in a highly secure system that relies on precision.
Finally, following the photo requirements shows that you are careful and compliant with the visa process. Submitting a photo that meets all specifications signals to consular officers that you pay attention to details and respect the rules. On the other hand, ignoring these rules or taking shortcuts can create delays, force resubmissions, and even affect your overall application timeline. So, while it might seem like just a small step in a big process, taking your visa photo seriously can make a huge difference in ensuring a smooth application experience.
Basic U.S. Visa Photo Requirements
- The photo must be exactly 2 x 2 inches (51 x 51 mm) in size.
- Your head size should measure between 1 inch and 1 ⅜ inches from the bottom of the chin to the top of the head.
- The background must be plain white or off-white, without patterns, shadows, or textures.
- The photo must be in color only; black and white photos are not acceptable.
- If submitting digitally, the photo should be in JPEG format and meet the file size requirements.
- The photo must be recent, taken within the last 6 months to accurately reflect your current appearance.
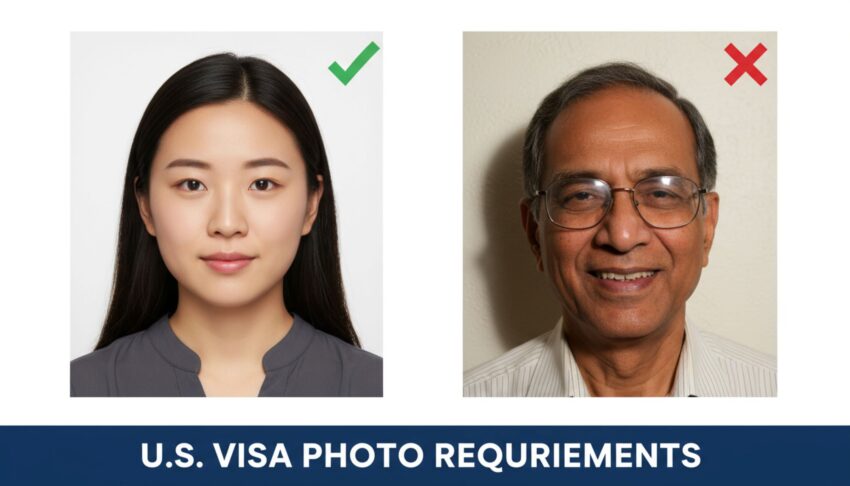
- Glasses are not allowed, even if they are prescription or have thin frames.
- Hats or headgear are only permitted for religious reasons, and they must not obscure your face in any way.
- Your face should be centered in the frame and take up roughly 50%–69% of the height of the photo.
- Maintain a neutral expression with your mouth closed and eyes open.
- Avoid shadows or glare on the face and background; lighting should be even and natural if possible.
- The photo should be high-resolution, clear, and not pixelated, blurred, or printed poorly.
- No digital alterations or retouching are allowed; the image must represent your natural appearance.
- Hair should not cover your eyes or face, and long hair should be pulled back slightly to show your features clearly.
- Jewelry is allowed only if it is small and non-distracting, avoiding anything that covers your face or casts shadows.
Photo Dimensions and Composition
| Aspect | Requirement | Details | Common Mistakes | Tips |
| Photo Size | 2 x 2 inches (51 x 51 mm) | Ensures face is clearly visible for identification | Using passport-sized photos or other dimensions | Use a ruler or professional photo tool to confirm size |
| Head Size | 50%–69% of photo height | Measures from chin to crown | Head too small or too large in frame | Center head and adjust distance from camera |
| Head Position | Centered in the frame | No tilting or leaning | Tilting, leaning, or off-center head | Look straight at the camera with eyes open |
| Expression | Neutral | Mouth closed, eyes open | Smiling too widely or frowning | Keep a relaxed, natural expression |
| Background | Plain white or off-white | No patterns, shadows, or glare | Colored or patterned backgrounds, shadows behind head | Use a plain wall or backdrop, ensure even lighting |
Clothing Guidelines
When preparing for your U.S. visa photo, what you wear is more important than many people realize. The goal is to ensure that your clothing does not blend into the background or distract from your face, which is the main focus of the photo. Solid-colored clothes, especially in darker tones, work best because they provide contrast against the plain white or off-white background. This contrast helps the facial features stand out clearly and makes your photo meet the strict U.S. visa requirements.
Collared shirts are a safe and professional choice. They give a neat appearance and frame the neck and shoulders in a way that looks balanced in the photo. While it’s best to stick to everyday attire, avoid uniforms or anything that might suggest a specific occupation, as this could distract from your overall presentation. Simple, classic clothing choices ensure that the focus stays entirely on your face.
There are also a number of things you should avoid when dressing for your visa photo. White tops are a big no because they blend into the background, creating a washed-out effect that can cause your photo to be rejected. Heavy makeup, shiny jewelry, or clothing with flashy patterns can also be distracting. Your goal is to present a clear, professional image that highlights your natural appearance without unnecessary adornments.
Camouflage, military patterns, or clothing with bold designs are also discouraged. These styles can create visual noise in the photo, drawing attention away from your face and potentially causing issues during processing. By sticking to solid, neutral tones and simple designs, you ensure that your visa photo looks professional, meets official guidelines, and is less likely to be rejected or delayed.
Glasses, Headgear, and Accessories
- Glasses are strictly prohibited, even if they are prescription, thin-framed, or lightly tinted. Any reflection or glare from lenses can interfere with facial recognition.
- Headgear is generally not allowed, except for religious or medical reasons. It must not cover or obscure any part of the face, including the forehead, eyes, or chin.
- Earrings are acceptable as long as they are small, simple, and do not cast shadows on the face. Large or flashy jewelry is discouraged.
- Necklaces and chains are allowed if they are minimal and do not distract from your face. Avoid statement pieces.
- Hats, caps, or scarves for fashion purposes are not permitted under any circumstances.
- Hair accessories like clips or bands are allowed only if they do not cover the face or create shadows.
- Eyewear alternatives like tinted glasses, sunglasses, or glasses with thick frames are completely disallowed.
- Medical devices on the face (like CPAP masks) should be removed for the photo unless medically unavoidable; a doctor’s note may be required in special cases.
- Facial piercings should be minimal; anything that obscures facial features should be removed.
- Headphones or earbuds must never be worn.
Lighting and Shadows
| Aspect | Requirement | Details | Common Mistakes | Tips |
| Lighting Type | Soft, even lighting | Avoid harsh flashes or overly bright light | Using direct flash causing glare or overexposure | Use diffused light or softboxes for even lighting |
| Shadow Avoidance | No shadows on face or background | Shadows can obscure facial features | Shadows from hair, nose, or background | Adjust lighting angle and distance to minimize shadows |
| Natural Light | Preferred if possible | Daylight gives balanced color and natural skin tones | Using artificial light that changes color balance | Take photos near a window or outdoors with indirect sunlight |
| Multiple Light Sources | Required indoors | Ensures face is evenly illuminated from all angles | Single indoor light causing uneven lighting | Use two or three light sources to cover all sides |
| Reflection Control | Avoid glare and reflections | Reflections can distort facial features | Light reflecting off glasses, jewelry, or glossy surfaces | Remove reflective accessories and adjust light angle |
Expression and Pose
One of the most overlooked aspects of a U.S. visa photo is your expression. While in some countries it’s acceptable to smile or even show teeth in official photos, the U.S. strictly requires a neutral expression. This means keeping your mouth closed and your eyes fully open, without squinting or exaggerated facial movements. The goal is to provide a clear and accurate representation of your face that can be easily recognized by border and security personnel.
Your pose is equally important. You must face the camera directly, with your head straight and centered in the frame. Tilting your head, leaning sideways, or looking slightly off-camera can distort your facial proportions and make it difficult for biometric systems to accurately match your photo to your identity. Think of it as a professional identification shot — precise, neutral, and straightforward.
Even subtle details can affect the outcome of your photo. For example, raising your eyebrows, leaning your chin forward, or even slightly smiling can result in a photo rejection. Border officers and visa processors rely on uniformity across all submitted photos, so consistency is key. Your expression and pose are not about looking happy or serious — they are about being recognizable and compliant with official requirements.
Finally, it’s helpful to practice your expression and pose before taking the photo. Stand in front of a mirror, look straight ahead, and maintain a relaxed but neutral look. This helps reduce tension or nervousness that might otherwise show up in your face, ensuring your photo meets all U.S. visa standards. A calm, natural expression combined with a centered, straight pose dramatically increases the chances that your photo will be accepted on the first try.
Preparing Your Face and Hair for a U.S. Visa Photo
Your face and hair play a bigger role in your U.S. visa photo than most people realize. Even small details can affect whether your photo is accepted or rejected. Ensuring that your face is fully visible, clear, and unobstructed is crucial for both human officers and automated biometric systems. Here’s a detailed breakdown of what to pay attention to before taking your photo:
- Make sure your hair does not cover your eyes, eyebrows, or any part of your face. Stray strands can create shadows or obscure facial features.
- Avoid hairstyles that dramatically change your appearance from your everyday look. Your photo must accurately reflect how you currently look.
- Tidy up facial hair, if you have any, so that it looks neat and uniform. Extreme changes in beard or mustache style shortly after submitting the photo can create recognition issues.
- Keep your face clean and oil-free. Excessive shine or sweat can reflect light and create glare, potentially affecting the photo quality.
- Remove any accessories that obscure the face, including large hair clips, headbands, or hats that are not for religious purposes.
- Avoid heavy makeup that changes your natural skin tone or appearance. Subtle makeup is fine, but it should not alter your features dramatically.
- Ensure your ears are partially visible if possible; they help with identification and make the photo compliant with biometric standards.
- Neutral expression is key: relaxed lips, eyes open, no frowning, and no exaggerated smile.
- Avoid covering scars, marks, or tattoos on your face; the photo should show your natural appearance without obstructions.
- Check for reflections from glasses, jewelry, or shiny clothing that may cast shadows on your face. Remove or adjust anything that creates glare.
- Tie back long hair if necessary to keep your face fully visible and the photo balanced.
- Stay consistent with your usual look: drastic changes after the photo can cause problems during verification.